If you’re having trouble getting your trolling motor wired correctly, I’ve been in your shoes. Installing a new trolling motor is relatively easy, but it is not intuitive the first time around.
In this article on wiring trolling motors, I will show you everything you need to get the job done and walk you through the process step-by-step.
Contents
Things you’ll need to wire your trolling motor
Here is a list of the parts that you will need for installation. Some of them will be included with your motor, but some you’ll need to get separately.
- Marine deep cycle batteries – The number of batteries you need depends on the voltage of your trolling motor: 12V motor = one 12 V battery, 24V motor = two 12 V batteries, 36V motor = three 12 V batteries).
Here are the best marine batteries available in 2024. - Terminal ends – The power wires coming out of your motor will have terminal ends installed, so you can easily connect them to your battery with a screw. However, you may need to replace them if your battery terminal is different.
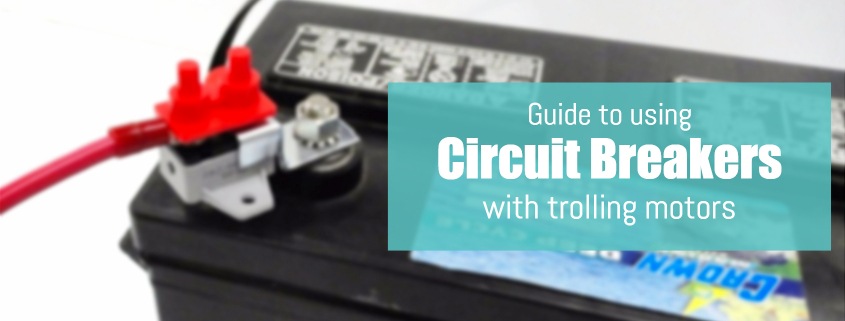
- Circuit Breaker – You need to install a circuit breaker between your motor and battery to protect the motor. Here is a guide on how to install the circuit breaker.
- Battery jumper cables – If you are using a 24V or a 36V motor, you will need short jumper cables to connect your batteries in series. I’ll talk about this below.
- Trolling Motor Plug & Receptacle – If you need to take your battery out of the boat to charge, a plug and receptacle will make your life just a bit easier. They let you connect and disconnect your battery quickly.
Now that you know what supplies you’ll need to connect your trolling motor to your battery, let’s have a look at what to connect where.
IMPORTANT: Always have a circuit breaker in the circuit! Your battery box may have one built-in, or you may have to buy one separately.
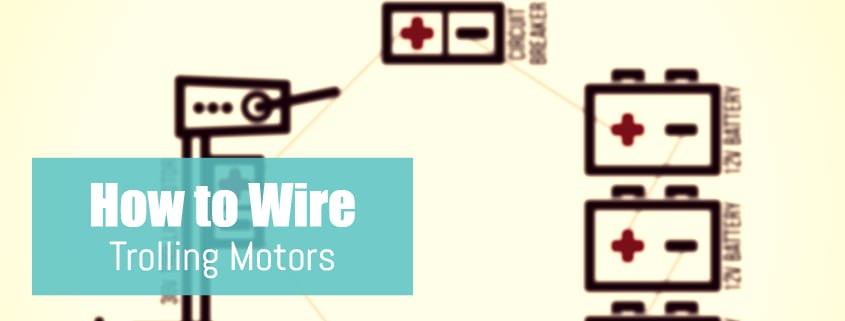
Wiring for 12-volt trolling motors
Here is a wiring diagram for connecting a 12-volt trolling motor to a 12V marine battery.
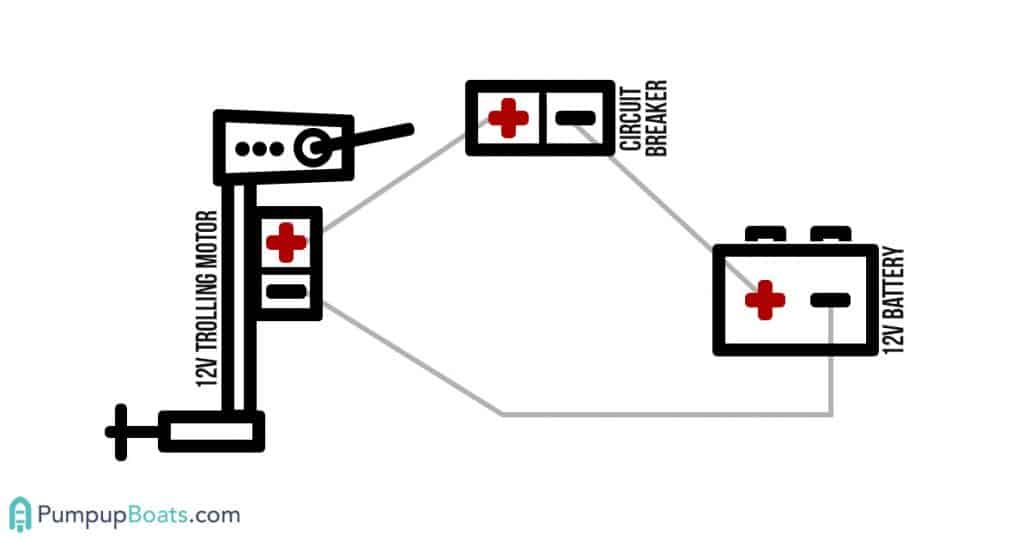
Steps to wiring a 12V trolling motor
- Step 1: Make sure the motor is in the off position.
- Step 2: Connect the motor’s positive connector lead (cable) to the battery’s positive (+) terminal.
- Step 3: Connect the motor’s negative (-) lead to the negative (-) terminal on the battery.
Wiring for 24-volt trolling motors (2 batteries)
Trolling motors under 62lbs of thrust typically use a single 12v deep-cycle battery.
If you want more power, you’ll need a 24V motor that requires two 12V batteries to be hooked together in series. (Just so you know, 24V batteries do exist, but they are rare and expensive.)
Here is the wiring diagram for 24-volt trolling motors.
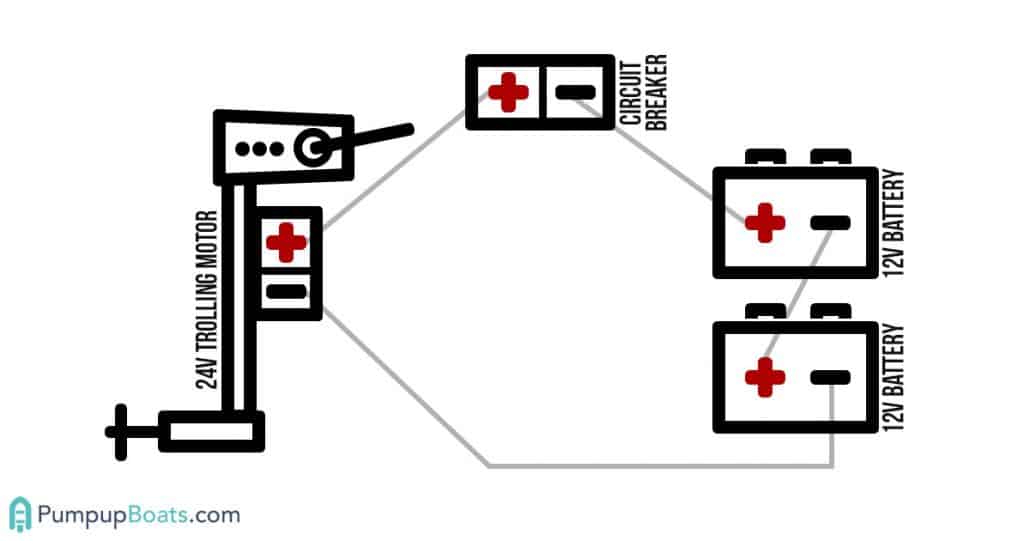
As you can see, you are hooking two 12-volt batteries up with the 24V motor.
Steps to wiring a 24V trolling motor:
- Step 1: Ensure that the motor is off.
- Step 2: Connect the motor’s positive (+) connector cable to the positive (+) terminal of the 1st battery.
- Step 3: Connect a jumper cable from the negative (-) terminal of the first battery to the positive (+) terminal of the 2nd battery.
- Step 4: Connect the motor’s negative (-) cable to the negative (-) terminal on the 2nd battery.
Be careful and double-check your wiring. Improper wiring of 24-volt battery systems could cause problems, including motor/battery failure, or even battery explosion! Use a circuit breaker to protect yourself and your gear.
24V trolling motor wiring kits
If you don’t have jumper cables lying around the house or the necessary supplies to make them, buying a wiring kit is a straightforward option.
Wiring for 36-volt trolling motors (3 batteries)
If you need even more power for larger boats, you can opt for a 36V trolling motor that will produce 112+ lbs of thrust.
Powering such a beast will require hooking three 12V marine batteries together in series.
Here is a wiring diagram for 36-volt trolling motors.
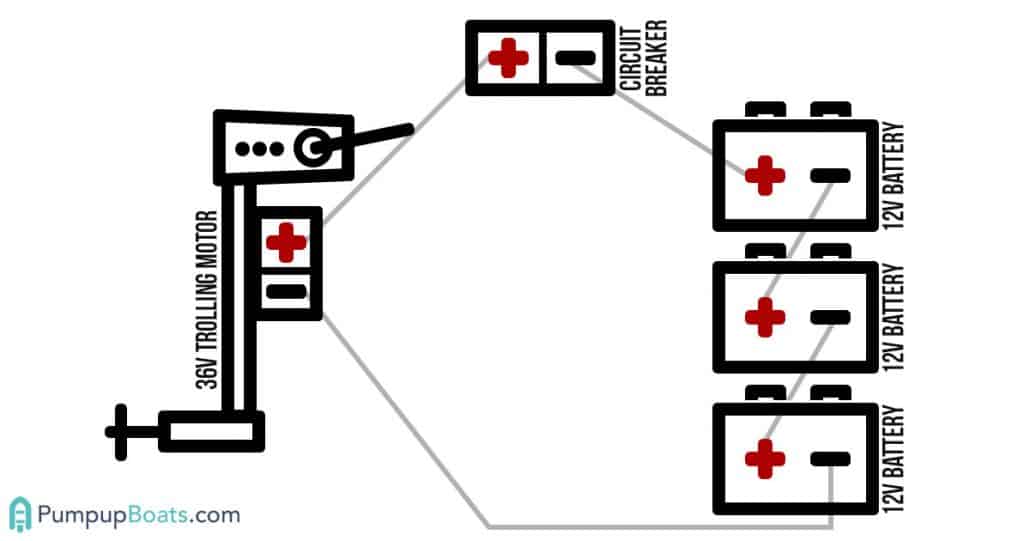
Placing so many batteries together will require more space on your boat, meaning you’ll probably need to extend the length of your wires. I’ll take more about this later.
How to connect a 36V trolling motor
- Step 1: Make sure the motor is in the off position.
- Step 2: Connect the motor’s positive connector cable to the positive (+) terminal of battery #1
- Step 3: Connect a short jumper cable from the negative (-) terminal of battery #1 to the positive (+) terminal of battery #2.
- Step 4: Connect another short jumper cable from the negative (-) terminal of battery #2 to the positive (+) terminal of battery #3.
- Step 5: Connect the motor’s negative (-) black lead (wire) to the negative (-) terminal on battery #3.
Again, make sure you have a circuit breaker integrated into your circuit.
36V trolling motor wiring kits
If you don’t have jumper cables lying around the house or the necessary supplies to make them, buying a wiring kit is a straightforward option.
How to lengthen trolling motor wires
The power leads on trolling motors are 3-5 ft (1-1.7 m) long. If you place your battery further away, you will need to add an extension to your wires.
The only thing you need to pay attention to here is the wire gauge you need to use when extending the wiring of your motor; otherwise, you will have performance loss through the extended cable.
And, of course, you should use insulated marine wire.
This wire extension kit from Newport Vessels is a good starting point if you need an 8 AWG wire. It includes everything you need to extend your wires:
- Marine-grade, 8 AWG extension cables fitted with hardware
- Brass bolts, nuts, and washers to connect the cables
- Electrical tape to cover the connection
Trolling motor wire size requirements
The wire size (gauge) you need for your motor-battery setup is a factor of 3 things:
- Motor thrust rating,
- Max amp draw,
- Wire length
As you can guess, higher thrust motors or long wires require larger wires.
The wire size (gauge) is measured using AWG, short for American Wire Gauge.
The smaller the AWG number, the larger the wire.
What size wire do you need to wire a trolling motor?
Here is a table of what size wire you need for various trolling motors and wire lengths, as recommended by the ABYC.
| Motor thrust | Motor voltage | 5' (1.5m) wire | 10' (3m) wire | 15' (4.5m) wire | 20' (6m) wire | 25' (7.5m) wire |
|---|---|---|---|---|---|---|
| 30 lb. | 12V | 10 AWG | 10 AWG | 8 AWG | 6 AWG | 4 AWG |
| 40 lb. | 10 AWG | 8 AWG | 6 AWG | 4 AWG | 4 AWG | |
| 50 lb. | 8 AWG | 6 AWG | 4 AWG | 4 AWG | 2 AWG | |
| 70 lb. | 24V | 10 AWG | 10 AWG | 8 AWG | 8 AWG | 6 AWG |
| 80 lb. | 8 AWG | 8 AWG | 8 AWG | 6 AWG | 6 AWG | |
| 100 lb. | 36V | 8 AWG | 8 AWG | 8 AWG | 8 AWG | 8 AWG |
| 110 lb. | 8 AWG | 8 AWG | 8 AWG | 8 AWG | 8 AWG |
Marine wire standards
The American Boat and Yacht Council (ABYC) establishes the standards for the manufacture & repair of electrical equipment, connectors, and wiring to be used on boats.
These rules are obliged to by boat and trolling motor manufacturers alike.
Marine wiring is different from wires you use on land. For starters, walls protect the residential wires you use in your home from corrosion and movement.
In contrast, marine wires and connectors you use on the water are bounced around and subjected to vibrations, variations in humidity, and temperature. They even get wet.
This means that marine wires need to be flexible and resistant to water corrosion, which can only be achieved with insulated, stranded copper wires. (Stranded wires are multiple wires within an insulating jacket.)
Marine wiring safety tips
Here are a couple of safety tips you should be aware of when doing any form of wiring on your boat:
- Leave some slack for the wire to move with the flexing of the vessel and compensate for temperature changes.
- At the same time, it should be tight enough not to allow the wire to bounce around in rough waters.
- Wires going around corners are often problematic. Make sure they are not too tight or too loose.
- Minimize the movement of all wires by securing them.
- Do not connect the positive (+) and the negative (-) terminals of a battery, as it will short the battery.
- Along the same lines, make sure that metal objects do not fall onto the battery terminals.
As always, if you have any questions about wiring trolling motors and batteries, please leave a comment below.