If you’ve got the skills and a few tools, you can convert your inexpensive inflatable raft to a full-fledged hard floored inflatable by building a hard floor. This popular mod requires some handy-man skills, but it is definitely worthwhile if you are looking for more stability on your raft.
But why would you want to DIY a hard floor?
- It’s much cheaper than buying a hard floor dinghy.
- It adds stability.
- You’ll be able to use your raft in new ways, like fishing, long river boat trips, or just to have a cooler in your boat while you’re out on the lake.
- And perhaps most importantly, floating on your own DIY floorboard will fill you with manly pride 😉
Let’s have a look at how to build a hard floor for your inflatable boat.
Contents
Which boat to use?
If you’re going to go through all the effort of building a floor for your raft, you should have a raft that is worth it.
Cheap $20 – $50 rafts are not ideal candidates. They probably won’t last as long as it takes you to DIY the floor.
You want to choose a reliable, good quality inflatable raft with thick tubes, such as:
- Intex Excursion 5 (my review)
- Intex Seahawk 4 (my review)
- Airhead Angle Bay (my review)
- Sevylor Fish Hunter 360 (my review)
Or a raft that is comparable to these in quality. These boats have thick sidewalls and durable seams to ensure they provide years of fun and safe usage.
Materials you need to build the floor
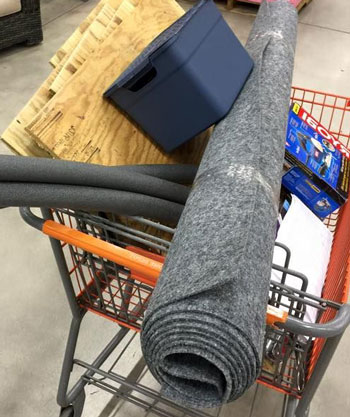
Here are the tools and components you’ll need to get started building your flooring.
You can buy/order whatever you don’t have from Home Depot, I’ll include links below:
Drop cloth or cardboard
To trace the floor area.
Floor material
There are a number of materials you can use as the rigid floor, including plywood, PVC, and marine-grade plywood.
I’ve found the best (and most cost-effective) to be 1/2 inch normal plywood. Don’t go for the 1/4 inch version, it won’t be stable enough out on the water when you stand up.
The standard size plywood that’ll work is the 4 feet x 8 feet one. You may need 2 of these if your boat is longer.
Expanded PVC sheets are another option, but they are slippery. I wouldn’t use marine grade plywood either, as it’s too expensive.
Primer (undercoat) and optional paint
What happens to wood if it gets wet? It warps and eventually rots.
This is why you’ll need to seal and prime the plywood using a waterproof wood primer. Apply 1 or 2 coats of it on each side and let it dry.
If you want to paint your floor, it’s best to use non-slip deck paint for this purpose. This is optional though, and not necessary if you carpet your floor.
Carpeting and adhesive
If you end up painting your plywood, this is optional.
I prefer carpeting, since it makes the floor a bit softer on your knees and feet.
You need to get indoor/outdoor carpet, which is resistant to UV and moisture.
To stick the carpet to your plywood, you’ll need to use indoor/outdoor carpet adhesive.
I would not use staples, since they will loosen and just cause problems. Sharp, pointy metal objects don’t mix well with rubber inflatables.
- Indoor/outdoor carpet adhesive (Home Depot) >>
- Pipe insulators
To protect the boat from the edge of the floorboard, it’s best to use pipe insulators around the entire floor.
Strut channels or jointing strips (optional)
The floor will be held in place between the boat’s inflatable floor and side tube, so it won’t move. Despite this, you may also want to join the floor pieces together.
To accomplish this, you can use:
- Jointing strips (also called H section) to make sure they stay together and nothing goes under the floor.
- Back-to-back strut channels, making sure you round off the sharp areas with a file, or put insulation material there. (Thanks Gordon for the idea!)
Tools
Here are the tools you’ll need:
- Some kind of electric hand saw (circular saw, jigsaw, etc) if you cut the plywood out yourself. If you are not comfortable with this, you can have the store do it based on your measurements. – Circular saw (Home Depot) >> or Jigsaw (Home Depot) >>
- Sandpaper or electric sander to smooth the edges of the plywood. – Sandpaper (Home Depot) >>
- Electric drill to drill floor inflation valve hole – Li-Ion drill/driver (Home Depot) >>
- Wood hole saw for the electric drill – Wood hole saws of various sizes (Home Depot) >>
- Paintbrush for priming and adhesive – Paint brush set (Home Depot) >>
- Trowel, spatel or putty knife (if laying carpet) – Trowel (Home Depot) >>
- Scissors
- Clips
- Marker
- Duct tape
If you have all the materials, let’s get to it.
Step 1: Floor measurements
First of all, you’ll need to get the exact measurements of the floor area of your boat.
You can do this with cardboard or my preferred method, with a large plastic drop cloth (9×12 feet).
I’ll give you the exact steps I took with a drop cloth, but as I said, you can replicate it with cardboard pieces.
- Inflate your boat and turn it on it’s back.
- Stretch the drop cloth onto the boat and duct tape it to the side tubes to keep it stretched out.
- Use your marker to create the outline of the floor area.
- Cut it out using your scissors.
Easy as 1-2-3. And 4.
This should result in an exact plastic replica of your floor.

Double-check its accuracy by turning the boat right side up and putting the drop cloth where your floor will go. It should fit snugly in between the side tubes and inflated floor.
Step 2: Woodshop class – working the plywood
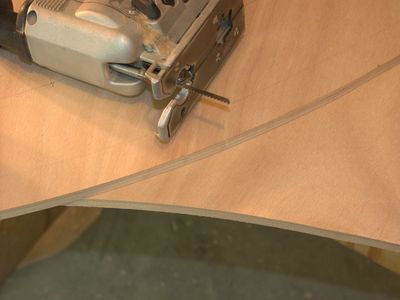
Here is where your handyman skills start to shine:
- Stretch the drop cloth cut-out onto the plywood, and fix it in place using tape or clips.
- Trace the edge onto the plywood with your marker.
- Cut the floor out of the plywood.
If you do not own a suitable hand saw (or don’t want to risk your fingers), your local hardware store will probably help you out.
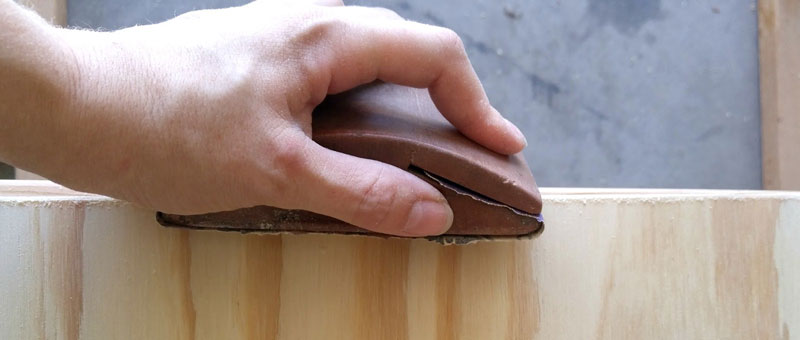
Sand the edges
You need to protect the boat from splinters by sanding the edges of thy plywood nice and smooth.
It’s quickest and easiest to use an electric hand sander of course, but you could do it with ordinary sandpaper as well.
Splitting the floor
It is best to split the final plywood cutout into 2 or 3 pieces, so you minimize storage space and make sure everything fits into your trunk. I cut mine into 2 pieces.
When you do this, you’ll need to reduce the total length of the floor if you’ll be using jointing strips in between the pieces, since the strips add a bit of length to the entire floor.
Since I made a 2 piece floor, I cut about 1/4 inch off the adjacent sides of the floor pieces. You could probably just cut 1/2 inch off the front or back, but since my Excursion 5 has a slight curvature, I wanted to spread it evenly.
Hole for floor chamber filling valve

Placing the boat on cold water on a hot day can cause the floor to lose air pressure, so you need to be able to access it without dismantling the entire boat and floor.
You will probably want to add a hole that will allow access to the floor chamber inflation valve, so you can top it off if needed.
Measure the exact location of the valve, mark it on your rear floor piece, and use your drill and wood hole saw to punch a hole of suitable size.
Step 3: Prime (and paint)
Wood and water? Not friends.
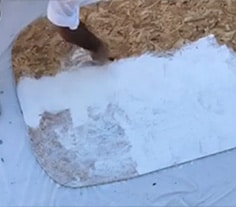
You need to waterproof your floor so that it doesn’t warp and rot out from under you.
First, you’ll need to prime it with a waterproof wood primer. This fills the pores and does a good job of preparing it for paint or carpeting. Make sure you go back and forth with your paintbrush, this will allow the primer to penetrate deep into all parts of the plywood.
If you decided on painting your floor instead of applying carpeting, this is when you would do it.
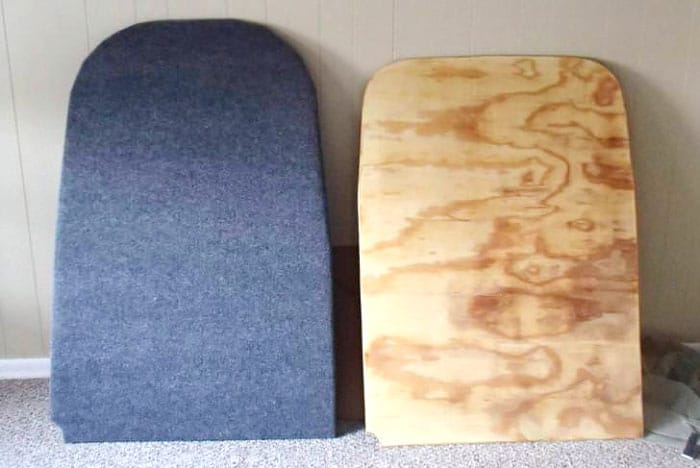
Step 4: Carpeting
After letting the primer and paint dry, you might want to carpet the floor. This will make the floor of your boat softer.
Grab your indoor/outdoor carpet, and let’s get to it:
- Lay your carpet out on a flat surface and place the plywood floor onto it.
- Mark the edge of the floor onto the carpet.
- Cut the carpet to shape.
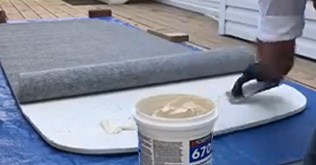
Once you’re done, quickly make sure the size is good by placing the carpet on the floorboard.
Next, you’ll need to grab your indoor/outdoor carpet glue, spread it onto your floor with a putty knife, and place the carpet on, pressing evenly along the surface of the carpet. to make sure there are no loose parts or wrinkles.
Let both sides dry for a day.
Some people make this much simpler, but more dangerous in my opinion. They wrap the carpet around the backside of the floor, and simply staple it there. This will undoubtedly work at first, it’ll hold the carpet in place just fine. But I wouldn’t be calm knowing that the staples are in contact with my boat’s inflated tube floor. Sooner or later a staple will back up out of the plywood, and possible puncture your boat.
These are my thoughts, but it’s up to you which method you choose though.
Step 5: Fit pipe insulators around edges
The next step of your DIY floor project will be to fit foam pipe insulators around the edges of your floor.
You need to do this for 2 reasons:
- It protects the rubber boat from the wood.
- Padding the edges helps keep the floor in place when you’re out on the water.

This step is pretty easy, all you need to do is split the tube on 1 side, and fit it around the edges.
I put some glue into the inside of the tube before placing it on, to make sure it stays put. Let the glue dry.
Alternatively, you could use duct tape for this, but it looks nasty and won’t stick too well on carpeting.
Another alternative I read was someone drilling holes 1 inch from the outer edge of the floorboards and using plastic cable ties through the hole and around the insulator pipe.
Again, I would not use staples for this. The foam will tear along the staple after a while. Not to mention that if a staple comes loose, it could easily puncture your boat.
How to inflate your boat with your new floor
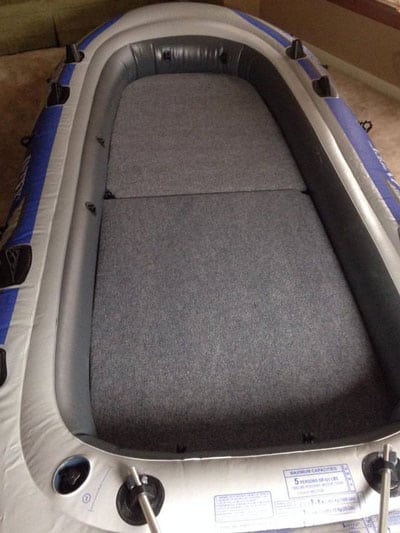
Now that you’re ready with your brand new hard floor, it’s time to test it.
Step 1: Inflate the floor chamber.
Step 2: Place the wood floor onto the inflated floor, placing jointing strips in between the floor pieces.
By the way, I saw another DIY-er add hinges in between the floor pieces, so his floor effectively folded up. It’s a great idea, since it not only keeps the floor pieces together, it makes storage easier as well.
Step 3: Inflate the rest of the boat. As you inflate the sides, walk around the boat and make sure the tubes are inflating right over the new floor, not pushing it to the side. You want to wedge the floor in between the air floor and the side tubes.
And that’s all there is to it. Go stand on your new hard floor inflatable raft, and be proud of your work!
How long does building the DIY inflatable boat floor take?
It will take 2 days to complete your floor.
“Why so long?”, you ask?
Not because you are a slow handyman, but because you want to let the primer/paint/carpet adhesive dry fully.
References
Here is a list of resources I used when making the floor.
- https://www.reddit.com/r/pics/comments/2iezv6/my_inflatable_boat_with_a_wood_floor_is_finally/
- https://forums.iboats.com/forum/general-boating-outdoors-activities/inflatables-and-ribs/325526-floorboard-question?t=317546
- https://imgur.com/a/fkXZ8
- https://www.instructables.com/id/Wooden-Floor-For-A-Seahawk-4-Fishing-Raft/
And here is a video I found useful.
Good luck, and let me know if you have any questions about this., and also how it went for you.


Hi, First thank you for the instructions. I am new to this and it is very helpful. Couple quick Q’s. I am confused about the jointing strips/H sections. I am planing on using 3 boards (for packing purposes). Do the struts connect the boards horizontally or along the sides vertically? Do you take them off each time to pack up/ are they permanently connected and then you put the soft pip cover around it? it seems to be it would be more stable on the seems if the struts were on the 2 horizontal cuts, so when you step on the crease it doesn’t give much…no?
Lastly, I’ve seen a lot of people in videos using hinges to connect the pieces. Would their disadvantages to going this route. Thank you in advance for your help!
Hi,
Hinges don’t add stability to the floor, they just make it easier to keep it together. Unless the hinges are facing down towards your normal floor, but that could damage it through abrasion. H sections are better. You place them in between each board piece. It’s best to screw it onto one of the pieces, it adds stability. So with your case, if you have 3 floor pieces, I would attach the H sections to the middle piece on both ends.
Hello are you selling the floor
Thanks Idan
(I am from the USA)
Hi, sorry but no. But it isn’t that difficult to make yourself, you will find detailed instructions on this page.
Wouldn’t the struct channels dislodge and puncture the raft in case the boat rides through a wake head-on ?
Thanks Tom! No need to glue or screw them. I just attach one 2-ft strut channel on one side, and another 2-ft strut channel on the other side. You need to remove parts of the foam pipe insulation to attach them. The chamber of the boat (once inflated) will keep them in place. Works fine with mild wind in a lake. I haven’t tested them in big waves though.
The struct channels are placed on the “SIDE” of the two boards, rather than “BETWEEN” the two boards. If you have a email address I can send you a photo showing how it is applied. Pretty simple and adds a lot of stability.
I also use a small cooler as a seat. Very convenient.
Oh, I see, that would make it super stable.
Yes, if you would be so kind and send an image, I could put it on the page for others to see as well.
Gordon,
Can you send that photo to me also? I would be much obliged.
Thank you,
John
Hi Tom, thank you for all the great instructions. About connecting two two pieces of boards, I used two 2-ft strut channel and they make the two boards almost as stable as one.
I chose aluminum ones from Grainger as they are lighter. I also put soft insulations around the areas I feel sharp.
Hi Gordon, that is a good idea with strut channels, I know people have been having difficulty getting jointing straps.
Did you screw the strut channels together back to back or glued them?
Hello. Could you please tell me what kind of glue you used to attach the pipe insulation to the sides of the floorboard? I put the zip ties on but it looks crummy.
Hi Greg, it was hit and miss because most glues didn’t hold or melted the foam pipe, making it stiff. I ended up having luck with contact cement.
If someone has never used power tools to cut an 8by4 sheet it’s not exactly easy. You need a fair bit of room to work in… You need to set it up on crates or blocks and make sure the saw misses everything underneath…. And make sure the cut piece is supported for that last couple of inches otherwise the saw can snag up.
Thanks. Mike.
That’s right. If you don’t know what you’re doing, it’s better to just get it cut to your specifications at your local hardware store.
I love this idea, but I have a premium inflatable boat (AM) that has an inflatable floor I cannot seem to fix. Glue patched didn’t work, toobseal didn’t work and slime tire sealant didn’t work. What do you think I could do to make the inflatable floor rigid enough to use the plywood method you did on top. The boat sits on a trailer so never needs to be rolled up. I just don’t want to buy another floor and the tubes do not leak, only the floor and on a seam. Any suggestions would be helpful. I had thought about pumping foam sealer in there to expand but I’m not sure.
I can’t find jointing strips! Can you provide guidance? Thanks!
They are also called H section, should be available at any hardware store.
Did you carpet both sides of the wood?
No, just the top. But I primed and painted the bottom side as well to make it as waterproof as possible
Hi!
I’m very new to learning how to do this. One thing you left off was the instructions about the jointing strip. What is that and how do you attach it? A google search didn’t answer my question so I hope you see this!
Thanks!
Deb
Hi, sure, here is an illustration:
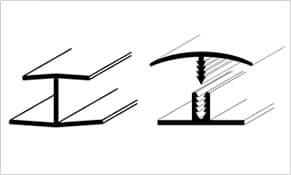
So a jointing strip is basically a plastic strip that holds 2 adjacent boards in place. When you put the floorboards next to each other and inflate the boat, you may find that they wiggle along their adjacent edges if they are cut a bit small. You can use a jointing strip to keep them in place.
Tom
I Googled jointing strips — nothing comes up. Are these the same strips you use to connect two kinds of flooring? THANKS!
Yes, they just hold 2 adjacent boards/panels together. Another name for the is H section. They are used to connect kitchen tops a lot, perhaps look there. Or just go to a hardware store and show the image to someone, they’ll point you in the right direction.
Wow, very detailed guide, I’ll try it this weekend. I have an excursion 5 as well, love the boat, but I’ve been wanting to carry out this upgrade for a long time. It’s great to have all the instructions in one place instead of jumping in between different forum posts as I’ve been doing until now.
Greets from California!